I’m My Own DIY Hero (With Help From the Internet)

Despite our house being a fairly new house, we’ve had some issues with our furnace for the past few years. The problems have always been intermittent, but happen at the worst possible times. As in, the colder it is outside, the less likely it would be that the furnace would turn on.

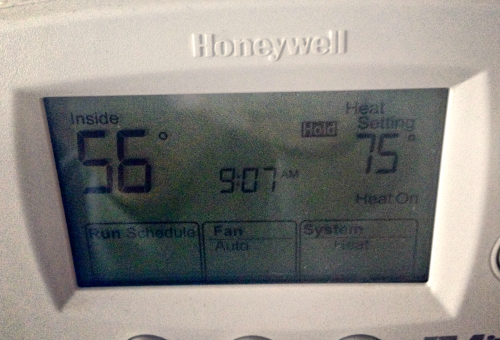
During last year’s polar vortex, I nearly broke down and called in an HVAC specialist to fix our furnace when we woke up one morning to a 55 degree house. But that same morning the furnace then came on and warmed us back up to a comfortable 70 degrees, so I let it go. If I didn’t have to spend a fortune on a repair, I wasn’t going to. (Yes, I’m cheap.)

Part of the reason I refused to call someone in is that, unlike the furnace, our gas fireplace has worked reliably. So even on days when the furnace wouldn’t come on more than once a day, the gas fireplace could keep the living room tolerably warm on its own during the day. Honestly, during the winter our gas fireplace is on for the entire day most days. We’ve found that it actually saves us money to keep it on. If the fireplace could get us through the most temperamental days of the furnace, we’d be fine.

This year, though, the furnace had been ignoring the thermostat more than usual. I knew it wasn’t the thermostat causing the problem – we had that replaced just four years ago, and in those cases the furnace wasn’t even trying to activate. In this case, the furnace would give it a try, the burners would ignite, and then it would shut off a couple of seconds later. This would happen 3-4 times in a row, and then the furnace would give up and stop trying.

Cold insideWe have a problem here.

So I recently found myself in the position of needing to call someone for a repair, or figure it out on my own. Google to the rescue!

After some searching, the leading theory was that the flame sensor was dirty and needed cleaned or replaced. The flame sensor detects if the burners actually ignite. If the sensor can’t tell if the burners ignited, it’ll shut everything down instead of risking gas flowing freely without a controlled flame burning it.

That explained all of the symptoms, but how in the world could I clean the sensor? I read a few guides, but they just weren’t thorough enough for me to feel comfortable with what I was doing. So I turned to my next DIY helper: YouTube.

I can’t begin to say how thankful I am for the folks who post YouTube videos of how to fix stuff around the house. They saved us when we needed to replace a leaky part of our kitchen sink a few years ago, they helped us learn how to snake our our toilet when a certain little kid used too much toilet paper, and they have now helped me repair my furnace. After watching two videos about the process, I felt comfortable giving it a try. (With Aaron as my backup.)

So, if you’re ever wondering how to clean the flame sensor so your furnace will turn on and stay on, let me show you how to do it:

Step 1: Turn off the electricity to the furnace. Important step here when you’re inserting metal screwdrivers deep into your furnace.

Step 2: Remove the cover of your furnace and find the burners.

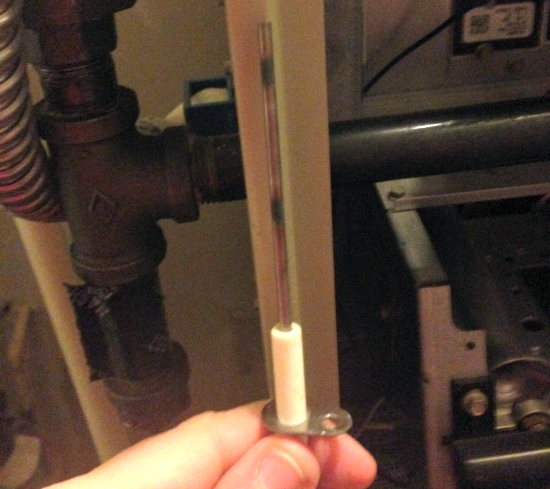
Step 3: Locate the flame sensor. It’s usually a thin metal rod sticking up in front of one of the burners.

Find the flame sensor

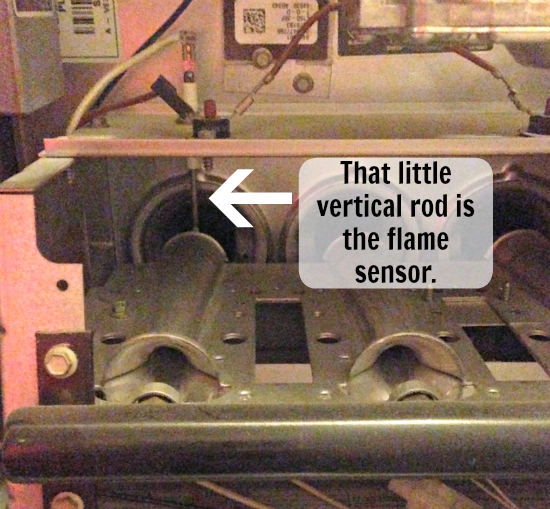
Step 4: Figure out where the sensor is attached. It usually has a screw holding it in, requiring a screwdriver. Or, in our case, an itty-bitty socket wrench. Ours was attached above the burners, but yours might be attached underneath.

flame sensor attachment
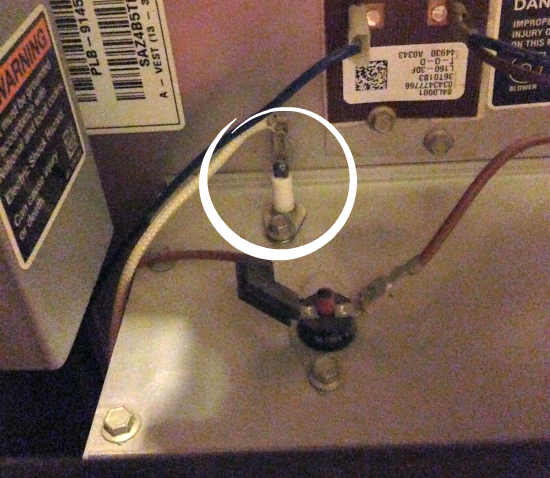
I circled ours – it attached from above the burners.

Step 5: Carefully remove the flame sensor after loosening the screw holding it. Don’t touch the metal part – the oils on your hands can damage it! See all that black and white stuff on the sensor? That soot is what was keeping it from sensing the flame properly.

dirty flame sensor
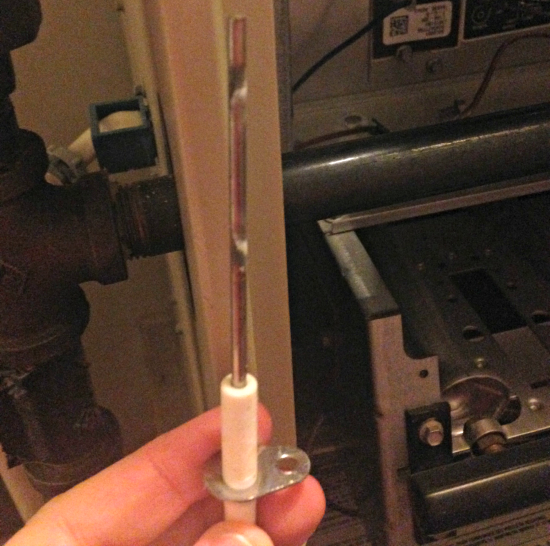
It doesn’t seem like much, but it’s enough to keep the furnace from working.

Step 6: Gently clean the sensor. Videos and written guides recommended a very, very fine grain sandpaper, soft steel wool, paper, or anything that isn’t too rough. The best suggestion I saw was using a dollar bill – it’s just abrasive enough to clean the sensor without damaging it. I used a crisp bill to clean ours. You won’t be able to get all of the black scorch marks off of it, and that’s okay. You’re only concerned with getting any loose debris off of it.

clean flame sensorIt’s cleaner, even if it doesn’t look that different.

Step 7: Carefully put the flame sensor back in place and secure it with the screw. Basically, reverse everything you did to get it out.

Step 8: Flip the switch at the circuit breaker box to power on the furnace again. Leave the cover off (if your furnace allows it) so you can check if everything is working. If all goes well, the gas will begin to flow, the burners will ignite, and they’ll stay on this time. If it’s all working well, replace the cover, pat yourself on the back, and go enjoy a warm house.
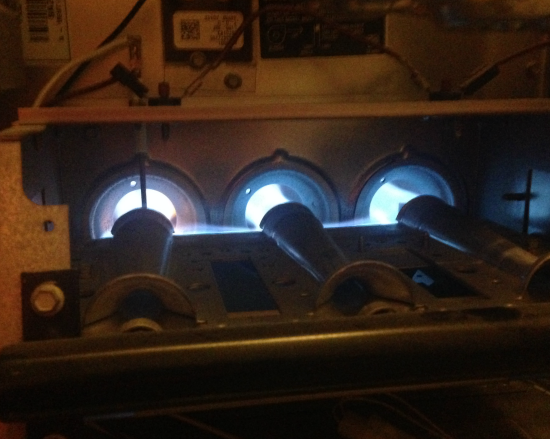
working furnaceA very happy sight.

If it doesn’t work, you might need to replace the sensor. I’m told this is a cheap part that you can find at any hardware store, and is nearly as easy to replace. In our case, cleaning it worked just fine.

Since cleaning it, we haven’t had any issues at all with the furnace. I’m still not very handy, but thanks to the internet I can do a great job at faking it some of the time!


Keurig 2.0 – The Ultimate Caffeinator

I love the smell of coffee, because it reminds me of mornings with my grandmother when I was little. My first taste of coffee was when I was a toddler. I liked to sit on my grandmother’s lap early in the morning, taking bites of her buttered toast, and begging for sips of her coffee. And yes, she would give in to my big toddler pout and give me a small sip of her coffee. I probably liked it because it had enough cream and sugar in it to appeal to my juvenile taste-buds.

I was a solid soda drinker through my teens and twenties, though, preferring my caffeine in a cold, bubbly, ultra-sweetened form. I think I preferred soda out of convenience – there was no need to put a filter in a machine, scoop coffee, wait, and then have more coffee than I wanted for a single drink. A can of soda was simple, just open and drink.

Let’s be honest: I was too lazy to bother with coffee unless I was buying it from a coffee shop.

And then the heavens opened and Keurig came down from above, solving the roadblocks for slacker coffee drinkers like me. I wanted coffee that was super simple, and they delivered – no filters, no scooping, and brewing a single cup at a time. Bingo!

I think you’re probably familiar with how a Keurig works: insert a sealed K-Cup into the machine, close the lid, choose your drink size, press the start button, and COFFEE! It’s really a brilliant, simple design.

We’ve had a Keurig for several years (two of them, actually – we wore out the first one after 3+ hard years), and as a mom of two with a full-time job, I rely on this machine in the morning to get my day started. I honestly didn’t think they could improve on the design.

Guess what? They improved on the design.

Meet my new morning best friend, the Keurig 2.0:

Keurig 2.0

I got a sneak peek of the Keurig 2.0 machines when I was at BlogHer in July. We learned about the new features and had a chance to try it out for ourselves at a small hosted breakfast. (Because OF COURSE breakfast, when we need our coffee the most!)

I know, it might look a little bigger than previous Keurig machines, however it still fits in the same counter space as my Keurig Special Edition. But this machine does so much more than my old one. It still will brew a single cup of coffee, tea, cocoa, or fruit drink for you like the old machine did. Now, though, they’ve opened up the world of multi-cup coffee brewing to those of us who don’t want a pot of coffee all that often and are too ADHD to remember where we put the bag of coffee from when my extended family wanted a pot of coffee at Christmas. (I still haven’t found that bag yet.)

Meet the Keurig 2.0 Carafe and K-Carafe pack:

Keurig Carafe

I can now brew a single K-Cup, or a 4-cup carafe of coffee from the same machine. The same machine! This is awesome to me. Most days I’m happy to brew a single cup with my breakfast. But then there are THOSE days, where one kid was up sick in the middle of the night, or I stayed up too late, and I need multiple cups to get me through the morning. Or days when I’m hosting a get-together or family during the holidays. Instead of brewing a single cup, I can brew a carafe, and just bring the carafe with me to my desk or to pour out for visitors.

And the K-Carafe cup is still just as easy to brew and dispose of as the K-Cup. (Lazy coffee drinkers, unite!) It’s a larger cup, but still fits in the machine without having to change or remove anything. The carafe itself also requires minimum setup – just remove the drip plate from the front of the machine and line up the carafe.

The brewer also has a scanner built-in to it now to scan the lid of the K-Cup and provide the perfect brew every time. There are numbered settings for brewing, too. The first number applies to the K-Carafe cups, but the others are still unused and were designed for future innovations to make the machine even more versatile. I’m hoping for lattes, Keurig. Just sayin’.

Other cool features of the Keurig 2.0 brewers:

  • Touch-screen display (in color, and with a programmable clock, for the K450 and K550)
  • The ability to adjust the brew of your coffee with the “Strong” setting
  • A new hot water on demand feature for the K550 model (ramen, anyone?)
  • Decorative decals for the brewer – if you like your small appliances to have a touch of color
  • Same water filter capabilities as the older models

There are a couple of downsides with the new machines, and both revolve around the scanning technology built into the 2.0. First, because the scanner must scan the lid of the K-Cup, the My K-Cup is no longer an option. So the days of using your own loose coffee or tea to brew a cup are gone.

Second, older K-Cups, and those that aren’t directly Keurig branded, will not work in the 2.0 machines. If the machine doesn’t recognize the lid of the K-Cup, it will not brew. Trying to brew a K-Cup without the new lid will result in an error message.

I was a little worried about how to tell if a box of K-Cups on the shelf at a store would work with the 2.0 or not. Keurig was quick to help me out by providing this image showing the new call-out added to all 2.0 compatible K-Cup boxes:

Keurig 2.0 call-outThat little check mark and message lets you know it will work for the 2.0.

I understand not wanting to have non-approved K-Cups used in the machine, but for those of us with a stockpile of K-Cups, many of our older K-Cups without the new label on top of the cup will not be recognized by the 2.0 machine. This means we either need to keep our older Keurig machine around until we go through those K-Cups, or get rid of them. I refuse to let a K-Cup go to waste, so we’re using both machines until we’re finished with our older K-Cups.

Aside from that one complaint, though, I really do love the Keurig 2.0. I’m giddy at having one easy-to-use machine for brewing a single drink or a 4-cup carafe. After trying out all of its features, I pulled our old 4-cup coffee maker out of the cabinet, handed it to Aaron, and told him to add it to our Goodwill donation box. If Keurig can come up with a K-Carafe pack for iced tea, I may ditch my iced tea maker, too. This machine could really help free up my cabinet space!

Hello Keurig 2.0

There are currently eight different varieties of K-Carafe packs, as well as 290 different beverages available as K-Cups. The Keurig 2.0 brewers come in three different models – the K350, K450 and K550, ranging in price from $149.99 to $199.99.

Disclosure: I attended a sponsored breakfast at BlogHer ’14 for Keurig and received a Keurig 2.0 brewer with some sample K-Cups and K-Carafe packs in the mail. (Which quickly disappeared – we buy a lot of K-Cups around here.) I wasn’t required to write a review post, but I’m happy to share why I love my new coffee machine and why you might like it, too.


Easy Chicken Dinner with Campbell’s Soup

Evenings have been a bit of a blur around here lately. With therapy appointments, gymnastics, homework, and everything else going on, it feels like we’re trading off who’s home each night, coming and going constantly. Tonight, for example, shortly after the kids are home from school, I have to get them in the car to go to Mira’s gymnastics, where we’ll meet up with Aaron after he’s done with work. Depending on who has more to do, one of us will stay at gymnastics and the other will take Cordy home to finish homework.

I’d be embarrassed to tell you the number of times we grab food on the go each week. I know it’s not healthy for us, but with such little time, it’s hard to put together quick meals that the kids will eat. And let’s be honest – I’m a lousy cook. Domestic tasks aren’t my strength. I usually leave the cooking to Aaron, but occasionally I’m called on to come up with a meal for the family.

When that happens, I’m thankful to find easy recipes that even I have trouble screwing up. Recently I heard about Campbell’s Wisest Kid in the Whole World promotion and their kid-friendly, easy recipes involving Campbell’s soups. I was invited to give one a try to see just how simple and tasty it could be. I love soup as an easy meal itself, but had never considered cooking with soup.

The hardest part was finding a recipe my family would all eat. Cordy is picky, Aaron is gluten-free, and Mira just occasionally decides she doesn’t like certain foods, after they were her favorite foods last month. (In other words, typical kid.) We looked over the recipes together and agreed on the Fiesta Chicken & Rice Bake, though, so that was my mission.

I liked the simplicity of this recipe: a can of tomato soup, some chicken breasts, rice, chili powder and cheese. I looked through the comments on this recipe and decided to add some corn to the mix, too. (Look at me, going off-script for a recipe like I think I know what I’m doing!)

Fiesta Chicken ingredientsThis is all you need to make this meal. (Plus a little water, if you don’t use pre-cooked rice like me.)

This recipe is also a single dish recipe, cutting down on anything complicated by mixing it all together in the same dish. It was honestly so easy to put together – I had it ready to go before the oven had even pre-heated! I was a little generous with the chili powder, as we like our dishes on the spicy side here.

Once the oven was ready, I covered the dish in foil, put it in, and baked for 45 minutes. I spent that time pondering how I could put together a dinner so quickly, and wondered if there was a catch.

Fiesta Chicken in the oven

When the timer went off, I pulled out the dish and peeled back the foil. I cut into a chicken breast to make sure it was cooked all the way through, which it was. And ta-da! – there was a perfect Fiesta Chicken and Rice Bake.

 Fiesta Chicken & Rice BakeI’m a lousy food photographer, but I can assure you this smelled and tasted delicious.

All that was needed at that point was a hefty dose of cheese and serving it to the family. It smelled SO good! I split a chicken breast between Cordy and Mira, and Aaron and I each took the other ones.

The result? Cordy loved the chicken, and ate some of the corn and rice. I’ll call that a success. Mira liked the chicken, didn’t like the rice, but singled out the corn to eat. I knew she’d like the corn. Adding the corn was a great idea and helped provide some additional flavor to the dish. I might even try adding black beans next time.

I thought the chicken was just right, tender without being dried out, but Aaron and I agreed it could have used a little additional spice. However, seeing how easy this recipe is, it would be equally easy to quickly add additional spice to meet the needs of our spicy-food-loving family. Even being light on spice, though, it was still delicious.

I was surprised just how simple it was to make this dish from Campbell’s. It’s easy enough that the kids can help with the prep work, giving them more control over their dinner. Or if we’re rushed, it’s easy for one person at home to start the meal while waiting on everyone else to get home.

You can find the recipe for the Fiesta Chicken and Rice Bake at Campbell’s website, along with several other kid-friendly recipes your family will love.


My To-Do List Needs Some Weeding

It just occurred to me that August is nearly over, which means summer is nearly over. And I’m now baffled as to where the time went?

I’ve been told the years fly by faster as we get older, and I’m convinced that the only reason this is said is because we pile on more responsibilities every year so we’re too busy to even remember to place the X’s for each completed day on the calendar.

Time didn’t fly as a kid. When I was eight years old, summer lasted for what seemed like forever. But at eight years old, my only summer responsibilities were picking up any toys I brought out of the house and being back home before dark. Hardly a packed schedule.

Now I have so much to do that things always get neglected due to running out of time to get to them. It’s vital to mentally sort what needs to get done from what I’d like to get accomplished and make sure the needs are finished before moving on to any “what I’d like to do” items.

And sometimes? Even the needs have to be sorted into extremely important and not-so-important categories. Hopefully you know what I mean – those days when you have to say “Do I NEED to do laundry today, or can these jeans go one more day?”

For example, at the beginning of the summer, I was excited to get outside and make this the year our yard looked nicer. We trimmed the edges of the lawn, I planted flowers around the base of the tree (which are still mostly alive despite my negligence), and I dutifully weeded around the house and the patio. There were plans to do even more, too.

But it didn’t happen. Other needs got in the way. Aaron has continued to mow all of the lawn regularly, since that’s one of those extremely important issues the HOA would crack down on. (Also, we don’t want ticks.) The front yard has even had the edges trimmed a few times, too.

But the backyard? Total disaster. My first weeding experience was intense, and I used a weed spray to make sure they wouldn’t come back. Weeds, however, are the genetic supermutants of this century, proving the theory of evolution as they laughed at my weed spray and grew back faster and with more vitality.

So fast, in fact, that some are trying to overtake my youngest child.

The weeds are too tall.Yeah, I’m just as surprised as you, Mira.

For reference, she’s four feet tall.

So yeah, the back yard is slightly overgrown. Or very overgrown, if you regularly keep a manicured lawn. In my defense, I had a lot of other stuff going on this summer, and didn’t notice that two months had gone by without weeding. And at this point I don’t know how much weeding I’ll get done going forward, other than the patio, cause we do use it more in the Fall. I may let the ultimate weed-killer – aka: Winter – take care of the rest of them and vow to start fresh in the Spring.

I have the best intentions with my to-do lists. But I overestimate what I can get done in a certain amount of time, then have to cut the list down to only the items that will cause problems if they’re not finished. Work gets done, food is purchased and prepared, bills are paid, the family and our clothing are kept clean, the house is kept sanitary (but cluttered), appointments are (mostly) kept, but everything else? It may or may not happen.

Someday I will be more organized, but that day is not today. The rest of this week is likely booked as well.

If anyone thinks they’re more organized and on top of their to-do list than me, please feel free to share your secrets to getting it all done in the comments. Cause my only solution at the moment would involve adding more hours to the day, and I’m not sure everyone else would be cool with slowing down the Earth’s rotation a little for that purpose, even if it did have the side effect of making us weigh less, too.


Green-like Thumb

When we bought our house, I was so excited about having our own yard. There were fantastic ideas in my head of beautiful landscaping and a garden in the backyard full of fresh herbs and veggies and a lush, green lawn for our children to play and walk barefoot on.

I don’t know who I thought would take care of all of these things – perhaps I thought we’d be wealthy enough to afford a landscaper? Because certainly I wasn’t going to be the one to nurture all of these plants.

My mom is the green-thumb in the family. She can keep nearly anything alive, even if it’s on the brink of withering away. I, on the other hand, am usually the one who can get a plant to the nearly-withered-away state. My ability to kill plants is nearly a superpower – if I were an evil villain, I’d probably be called the Wilter.

It’s not intentional, though. I try to do my best with our yard. I had a garden for a few years, and even managed to produce some broccoli from that garden. Cosmo has reduced my ability to have a garden now, thanks to his evil sidekick taste for young plants, but I did do some container gardening last year that was a semi-success. And (with help) we planted our little arborvitae evergreen trees out back last year, which have so far survived my care.

With my new mission to make this house a little more home-like, I’ve had to take a tough look at the outside as well. I don’t want to be that house in our neighborhood. (To be honest, it would be really hard to be that house with the number of rentals and foreclosures in our area, but I’m also aiming to not be in the bottom 50% either.) My project this past weekend was the tree in our front yard.

We placed a little ring of landscaping bricks around this tree years ago. Originally there was mulch inside the ring, but over the years it’s all disappeared and the ring has contained a mess of dead leaves and weeds. Our soil is also extremely hard clay soil, making it impossible for things to grow well, and that’s resulted in our tree’s roots staying close to the surface as well.

The first thing I did was scoop out all of the leaves into a yard waste bag, along with pulling most of the weeds within the ring. Some of those weeds were stronger than expected and tried to pull back. Then I carefully adjusted the woefully uneven bricks, trying to make them lie even again. I wasn’t able to get them to lie perfectly even because the tree roots have pushed some areas up, but most of the ring looks pretty good now.

No weeds or dead leaves, but not pretty.Tree roots made the back part of the ring bumpier than I’d prefer.

Next, it was time to fill in that ring. I emptied three bags of topsoil, combined with half a bag of peat moss, inside the ring around the tree and mixed it all up. At the very least, I hope covering the tree’s roots will help protect our red maple from the fate of so many other trees in the neighborhood. (Tree death is high when you live in a new subdivision that stripped all the topsoil off to sell before building houses on clay.)

Mira went with me on Saturday to pick out flowers to plant in the ring. A five year old doesn’t necessarily know the best flowers to pick, so I enlisted the help of a store associate. After describing to her my lack of skill with anything green, and my requirement that anything we buy needs to be easy to care for, able to handle some neglect, and preferably could handle itself like a weed, she pointed me to the right flowers. She didn’t even laugh at me, though, which I appreciated.

This was the final result:

Look! Pretty flowers now!Not a bad transformation compared to the naked tree above, right?

The light purple flowers are creeping phlox, and the bright pink ones (Mira’s choice, no surprise) are dianthus. And yes, I still had to look at the little cards that came with them to remember what they were and how to spell them.

There was nothing complicated to planting the flowers – I dug a hole with my hands, took the flower out of it’s plastic pot, and plopped it in the hole, filling the area back in with dirt. I’m not sure if I spread them out well enough, so we’ll see how they grow. I finished this project by covering everything with a good layer of mulch and a silent wish that they don’t die.

Can I keep them alive now?No really, please don’t die, little flowers. You cost too much.

And just like that, our front yard has a little bit of color now, hinting that someone actually lives in this house and cares about it’s appearance. The next step, of course, will be keeping these little plants from wilting away. Who knows – maybe if I can keep this little contained flower bed alive, I’ll add more flowers to other parts of the yard?

Related Posts Plugin for WordPress, Blogger...