Adventures in Adult Acne

When I was recently at the dermatologist for my twice-a-year mole check, the assistant asked if I’d noticed any changes with my skin. I told her the few places I thought had changed, and then half-jokingly added, “Oh, and my chin has now become home to several monster pimples.”

She then began asking me several questions about my chin. I continued to not take my pimple issue seriously, telling her how I’ve never in my life had these large, deep (and painful, to be honest) pimples before and I guessed it was probably part of the joy of growing older. You expect the grey hairs and wrinkles, but no one ever tells you about the thinning eyebrows, whiskers on your face and neck, and pimples that also appear in the second half of your thirties. (Sexy, right?)

I never intended my casual mention of my chin acne to result in a full discussion with my dermatologist about hormonal changes in our thirties and how it can result in acne coming back. Wrinkles and acne – so not fair. I fully expected to be told that Clearasil isn’t just for teens, but instead she recommended a prescription cream called Aczone to help ease and hopefully prevent some of the acne breakouts. I’m not a vain person, but I’m also in favor of not having painful breakouts on my chin, so I agreed to try it.

As her assistant handed me the slip of paper on the way out, she also handed me a discount card from the drug company. “Oh, I have insurance,” I told her.

“You’ll probably still need this,” she replied.

She wasn’t kidding. When I went to pick up my prescription, I was told it was $75 – with insurance. For an acne cream? So I handed over the discount card, which took the total cost down to $25. That was far more reasonable. It wasn’t until I looked at how much I saved with insurance that my jaw dropped:

It cost HOW much?

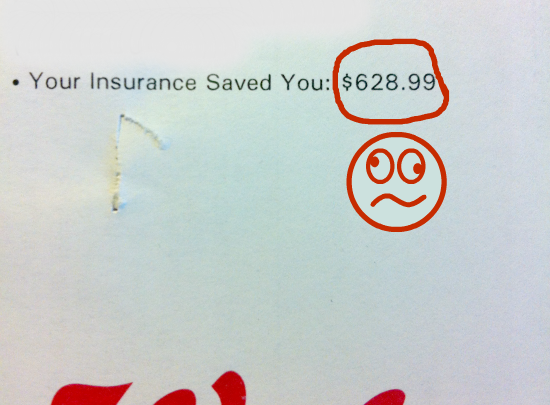
Again, I ask – for an acne cream? Is it made from unicorn tears filtered through a golden, diamond-encrusted sieve? How can an acne cream seriously cost so much?

But wait – it gets better!

Since I’ve never heard of this stuff before, I carefully read through the side effects, cautions and warnings. (As we all should.) A few things caught me by surprise. First, whatever this stuff is, it’s not to be used while pregnant or breastfeeding: “This medicine is found in breast milk. Do not breast-feed while taking this medicine.” No worries there for me, but I’m again wondering what chemicals are in this cream that make it even more toxic than the pesticides on our food?

The side effects were pretty standard: “Side effects may include dryness, oiliness, peeling or redness of the skin.” Wait, I thought this was to make my skin look better? It continued:

Contact your doctor immediately if you experience dark urine; fever, chills, or persistent sore throat; mental or mood changes; numbness, swollen, blistered, or peeling skin; severe stomach pain or vomiting; shortness of breath; sudden back pain; suicidal thoughts or attempts; unusual tiredness or weakness; or yellow or pale skin.

And those weren’t even the allergic reaction symptoms. No, flu-like symptoms, blistered skin, stomach and back pain, mental changes and thoughts of suicide are just things that could happen to you even if you weren’t allergic to this topical cream for acne.

Then there was this warning in the leaflet:

Do not try this at home.
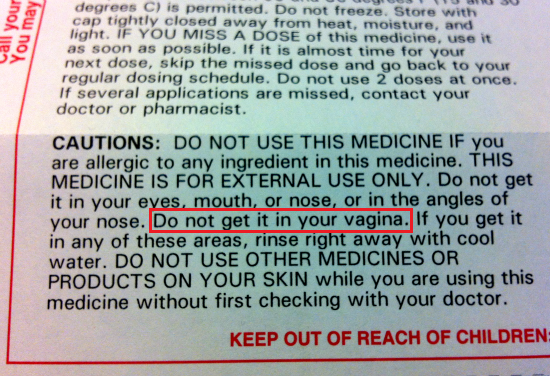
I wasn’t planning on it, but good to know!

Let’s be honest – you know they only put those warnings in there because someone has tried it. I don’t want to know what the thought process was that led to someone trying that.

Folks, if you think you have acne in your vagina, please go see your gynecologist, because I’m pretty sure that’s not acne.

Ewwww

On the upside, this prescription really is magic. When applied to a newly forming red spot on my chin before bed, it’s already less painful and less red the next morning. I don’t know if it’s $600 worth of magic, but I’ll say I’m impressed as long as I don’t develop shortness of breath or suicidal thoughts.


It’s Time For A Diet Tune-Up

Confession: I’ve gained about seven pounds this winter. Ahhhh, that feels better to admit.

Wait…no, it doesn’t.

I always gain a little weight between Halloween and the end of Winter. I enjoy the holiday eating, and I’m not as active during the cold season. I don’t mind a few pounds of gain, but seven is on the upper end of my comfort zone.

Hibernation season is over now, and it’s time to get back on track.

I’m choosing to start by restructuring my food, which is easy considering all of the junk we’ve been eating lately. Step one is getting all of the bad stuff out of the house. Since I don’t want to throw it all out, that means this week is eat all the food week.  And OH we have a lot of it.

 Please note the Nutella shown here is no longer an issue.

Once it’s all gone, we’re switching to a diet of real food. Fruits, vegetables, nuts, beans, lean meats and limited grains. It’s not quite paleo, since we can’t give up dairy and beans, but limiting our grains should be easy. Aaron is gluten-free already, so his grains are already limited. The goal is to limit processed foods to less than 20% of our diet. Baby steps, folks.

And we’re slowly detoxing from diet soda. I have a hard time giving up my diet soda, but I know it’s for the best because of all of the chemical junk in soda. At the moment we’re not buying soda to keep in the house and only drinking it when we eat out. This has left me with some massive caffeine headaches, partially because our Keurig machine has decided it’s coffee brewing days are done. I broke down and ordered another one, but it won’t be here until the end of the week.

Eating better isn’t just about losing weight. My children also have fallen into some poor eating habits. Mira used to eat apple slices and bananas almost daily, but now she holds out and begs for processed snack crackers instead. (Cordy still eats apple slices all the time. She has a limited list of fruits she’ll eat, but at least she’ll eat some.) It’s up to us to set the right example to get them back on track, too. If there’s less junk food in the house, there’s less unhealthy options for meal and snack time for all of us.

Plus? It’s all about giving myself the best chance to live a long, long time. I lost all of the weight to begin with because I didn’t want to be unhealthy around my kids. Now that I’m a few years older, it’s not just about being unhealthy around them, it’s about living long enough to see grandchildren someday. (Which I want to be a LOOOOONG way off, just to be clear!)

I’m a lot smaller now, but my insides still aren’t so healthy. I’m lousy at full-life adjustments, so it’s about baby steps and making tune-ups to my habits, and now it’s time to tune-up my diet again.

What are your best eating natural tips? I’ll be stalking all of your Pinterest boards for easy recipes this week.


The Things I Do For Awesome Hair

Last summer I decided to do something fun with my hair color and dye the ends purple. The ombre look was fun, even if it was a little difficult to achieve. The most common way to do an ombre color is to tease (backcomb) the hair so that when you bleach out the ends you don’t have a solid line of color change, but more of a gradual change instead.

Then after bleaching the ends, you comb out the tangled mess before applying the color. It’s not comfortable, but the first time I didn’t find it too awful. The whole process took about four hours, including an all over color on the top 3/4 of my hair, too.

So when I felt my hair was drab last week and needed a lift, I made an early morning appointment for another ombre color. I decided to go with the darker brown on top again, but thought red sounded fun for the ends of my hair.

This time wasn’t as smooth, though. I had the all over color and a color correction, although the stylist chose to do the all-over color on the ends. That part alone took over three hours – longer than I had planned. Then the backcombing began – I worried that maybe she was a little bit too overzealous with teasing my hair, as I quickly had hair that looked like I had electrocuted myself.

Beauty can look super ugly at first.

It took longer than normal to bleach out the ends, because she had just applied the top color to my hair, including the ends. It was now mid-afternoon. I was tired and hungry and really wished it was all over.

When it was time to rinse out the lightener, the worst part of the process started: combing out the tangled mess that was my hair. She really did go too far in backcombing my hair – it was locked into a giant knotted ball. It took one hour, two stylists – one working on each side of my head – and a bucket of conditioner to get my hair combed out. One hour of tugging and pulling and yanking and sharp pain and holding back tears. Near the end of it I was shaking from the pain. (I have a tender head, too, which doesn’t help.)

At that point I had been there for over six hours and wanted to go home. But I still had to get the color on my ends. I slumped in the chair, exhausted from the ordeal and hoping this would all be worth it.

Eight and a half hours after I first sat down in the chair, my hair was done. I have to admit, it looks really good. I love the ombre look – it’s subtle while at the same time being a bold, fun choice.

It looked even better after I had it styled this weekend:

(My new headshot – cute, no?)
The view from the back.

I hated the process to get hair that looks this awesome, but I have to admit I love the finished look.

I also took notes on how my hair was styled this weekend, too, so I can try to create my own gorgeous curls at home. This BlogHer TV video below shows one way to do it, creating Selena Gomez inspired body and soft curls with a wide curling iron, a comb and some hairspray.  What do you think – does it look easy enough for an amateur like me to do at home?

It looks simple enough, although the backcombing has me a little scared after what I went through last week. I may have nightmares about teasing my hair for years to come.

(PS – BlogHer and Olay are giving away $100 or more with this video – if you watch and answer the question at the end of the clip, you could be a winner!)


Domesticity, Conferences and Dresses

Over the weekend we moved a little closer in my goal of making this house look like it has permanent residents and not just transients passing through. Two more rooms have curtain rods! Like, real curtain rods screwed into the walls, and not spring rods. That makes twice as many as we previously had.

 Please ignore the bad lighting, ugly ceiling and lack of paint. Work in progress, folks.

The living room curtain rod (which I bought over two months ago and has been sitting in a box) is also now in place, although still lacking in anything to put on it. But now that it’s in place, I’m more motivated to buy curtains. Mira’s room also has a new curtain rod and new curtains. No surprise, she picked pink striped curtains.

—–

I’m also making progress on my desk area. I bought this file organizer at TJ Maxx and can’t wait to hang it on the wall and start using it:

I love the chalkboard panels on each pocket. I don’t have a lot of papers I need for work, but if I hang it just off to the side of the desk, I can also use it to organize school papers, tax info, etc. There’s a lot of possibility with it.

—–

Mira recently asked me to make her a shawl. She had noticed the shawl I occasionally wrap myself in and when she found out that I made it, she wanted one, too. It’s been over a year since I knit anything, mostly due to an inability to carve out time for myself, so I thought this might be a good way to get me back into knitting. I clearly had no idea what I was agreeing to, however, when I took her out on Sunday to pick out the yarn for her project:

Ouch. Hot pink with bits of metallic shimmer. Well, at least there will be no way to lose her when she wears it. She’ll probably be visible on Google Earth maps.

—–

I’m going to the Blissdom conference later this week in Dallas. This will be my first trip to Texas, not counting changing plans in Houston a few times. I’m looking forward to seeing old friends and meeting lots of new bloggers and generally immersing myself in the blogging world for a few days.

Going to blog conferences now (for me, at least) isn’t so much about picking up new tricks for blogging as it is about networking and getting inspired. I’m fairly set in my ways, but I love finding new folks to read and hearing the “we matter” blogger pep talk that refreshes me and keeps me writing.

I still have to pack everything for the trip, which is the worst part of going to any conference. It seems like the minute I need to pack for a trip, my entire closet of clothing is suddenly too tight, too loose, or doesn’t match with anything else. Frustrating.

And of course there’s the flying part. I still hate flying. Here’s hoping it’s a smooth flight so I don’t grab the arm of the person next to me if there’s turbulence.

Anyone else going to be at Blissdom? I’m usually not hard to find, since I rarely stay in one spot for long. As long as you’re in one spot, I’m sure I’ll pass by. On Friday night, you’ll probably see me in a dress that looks a lot like this:

Only mine has cap sleeves and is longer.

I’ll be reviewing this dress soon. I received it for review from eShakti, and (spoiler!) I love the dress and the company. I’ve yet to find anywhere else that will customize a dress to fit you perfectly. (If you’re already interested in shopping for a new dress, I have a coupon code for your order – just use the code MMMYSTRY for 20% off.)

Now everyone think good thoughts that I don’t spill something all over myself or fall down stairs or completely offend someone with an ADD-moment or do something else to embarrass myself while I’m at Blissdom. (I’ll also chicken out on karaoke to keep myself from absolute embarrassment.)


Creating My (Tiny!) Home Office

 
It’s been nearly a year since I started working from home. During this time, I’ve wanted to have a home office of my very own, but didn’t have the time to design anything or find the space for it.

So my office has been the corner of the loveseat with an end table to place my laptop and a folding table in front of it to hold my notebooks/glasses/pens/etc. It wasn’t my intention to keep such an unofficial (and cramped) work space for such a long time, but hey, at least it’s a comfy place to sit.

Earlier this year, my aunt bought a new house – a larger house – and I saw an opportunity to create some space here for myself. I had been visualizing the area between our living room and the dining room as the perfect spot for a mini-office.

The only issue was the piano taking up all of that space. The upright piano is mine, a gift from my grandmother after I taught myself to read music and play piano when I was a kid. I love the piano, but it hasn’t had a lot of use lately. I rarely get a chance to play it, and both Cordy and Mira have shown zero interest in wanting to learn to play. 

So I asked my aunt if she would take the piano for us, at least until we (someday) have a bigger house where it might fit. Since there was plenty of room in her new house, she gladly accepted it (she can play as well), and offered me her desk in trade.

I had planned to find my own desk for the office, but when given the option of a free desk and chair, it’s hard to turn it down. Free trumps even IKEA prices.

My new office space now has a basic structure to it, which leads to the real dilemma: how do I transform this area into a super-usable office? I’m starting (nearly) from scratch with it. This is the current set-up:

The kids’ bookcase on the left will be moving a little further to the left to give me some space. To the right is a small filing cabinet with the printer on top of it. The desk fit perfectly where the piano used to be. Realize this will be a very small office crammed between two other spaces – for reference, I’m taking these photos perched on the staircase.

 (There’s still cleaning to be done, of course. And I need to move that framed art hiding under the table at the moment.)

Kinda bland, eh? I still need to scrub down the wall to remove the years of dust from behind the piano, but as you can see, it’s a blank canvas, waiting to become a beautiful office.

I’m begging for ideas here. What does this space need? I’m already considering some shelving on the wall and possibly a calendar. I might add a roll-out filing cabinet under the desk, too. There’s very little natural light in this area of the house, so maybe a lamp? Or bright artwork to make it more cheery? (My Happy Light will likely be joining the desk space as well.)

Because this area is the connector between the living room and dining room, I’ll also have to find a way to make it look like it’s own defined space without walls, doors or room dividers. I’ve got just under 8 feet of width along the wall with four feet out from the wall to work with – anything further out will cut off the walkway between rooms. 

I know several of you are gifted with the creative gene, so I’m hoping you’ll help me brainstorm ideas for transforming this into a bright, cheery office that I will look forward to working from each day. Once it’s all in place, I’ll do a big before-and-after reveal.

I can’t decide if being excited about having a real home office space is normal or just proves I’m old?

Related Posts Plugin for WordPress, Blogger...